
Connect LuxAlgo Vela to MT5
Send a one-time Vela alert to PineConnector, then verify a buy or sell on your MT5 demo account.
Connect a LuxAlgo Vela alert to MetaTrader 5 (MT5) through PineConnector. First, send a connection check that does not place a trade. Then send one buy or sell request to your demo account and check the result in MT5.
Vela detects your condition → PineConnector passes on your message → MT5 processes the request
Before you start, you need:
- A PineConnector account with an MT5 demo account already connected, either through PineConnector Edge (hosted MT5) or your own Windows PC / VPS. If you have not connected MT5 yet, complete Connect MT5 first.
- Access to LuxAlgo Vela on Essential or above, which supports webhook destinations. Check LuxAlgo’s webhook requirements.
- A Vela chart receiving live prices. For the trade test, the broker’s market must also be open.
1. Pick your demo connection
Section titled “1. Pick your demo connection”- Sign in to PineConnector Portal and open Connections.
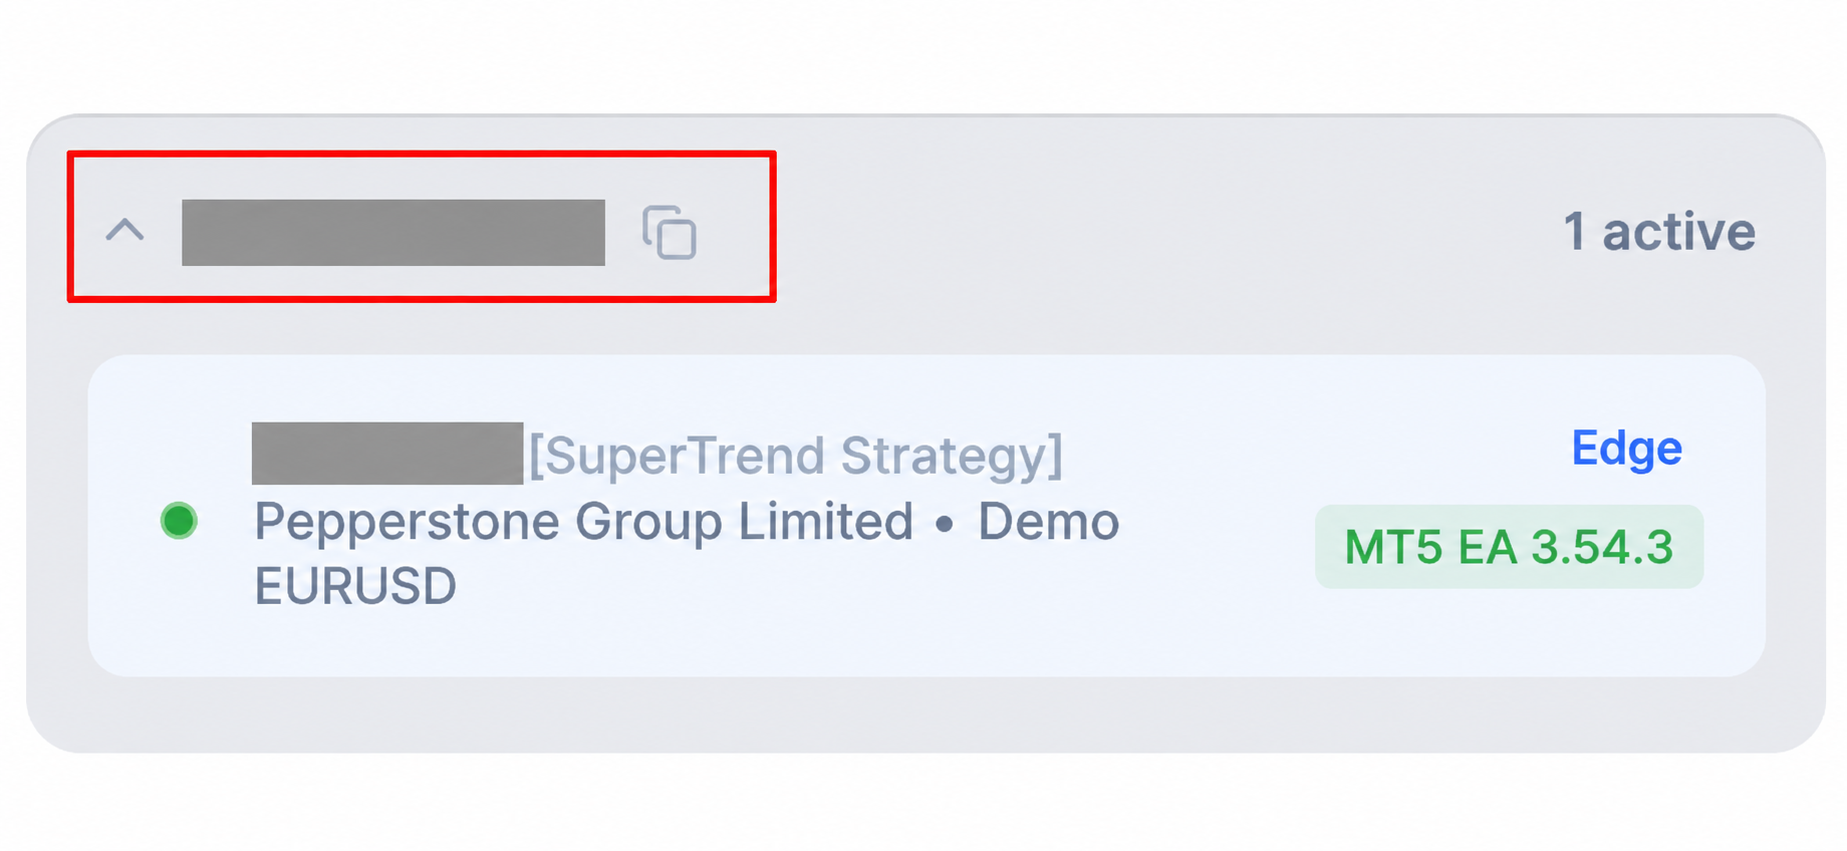
- Find your intended MT5 demo account. Check its broker and account number, and confirm that it is connected.
- Check all accounts listed under the same License ID. For this walkthrough, use an ID connected to exactly one demo account.
- Select the copy icon beside License ID. Keep the copied value for step 4; paste it unchanged when replacing
LicenseID.
No ID for a single demo account? Follow Use a separate License ID before continuing. Check your available allocation in Connections, and ask PineConnector Support if you cannot separate the demo account. Do not disconnect an account running live automation just to complete this test.
2. Set a one-time trigger
Section titled “2. Set a one-time trigger”- In Vela, open the chart you want to use for the check.
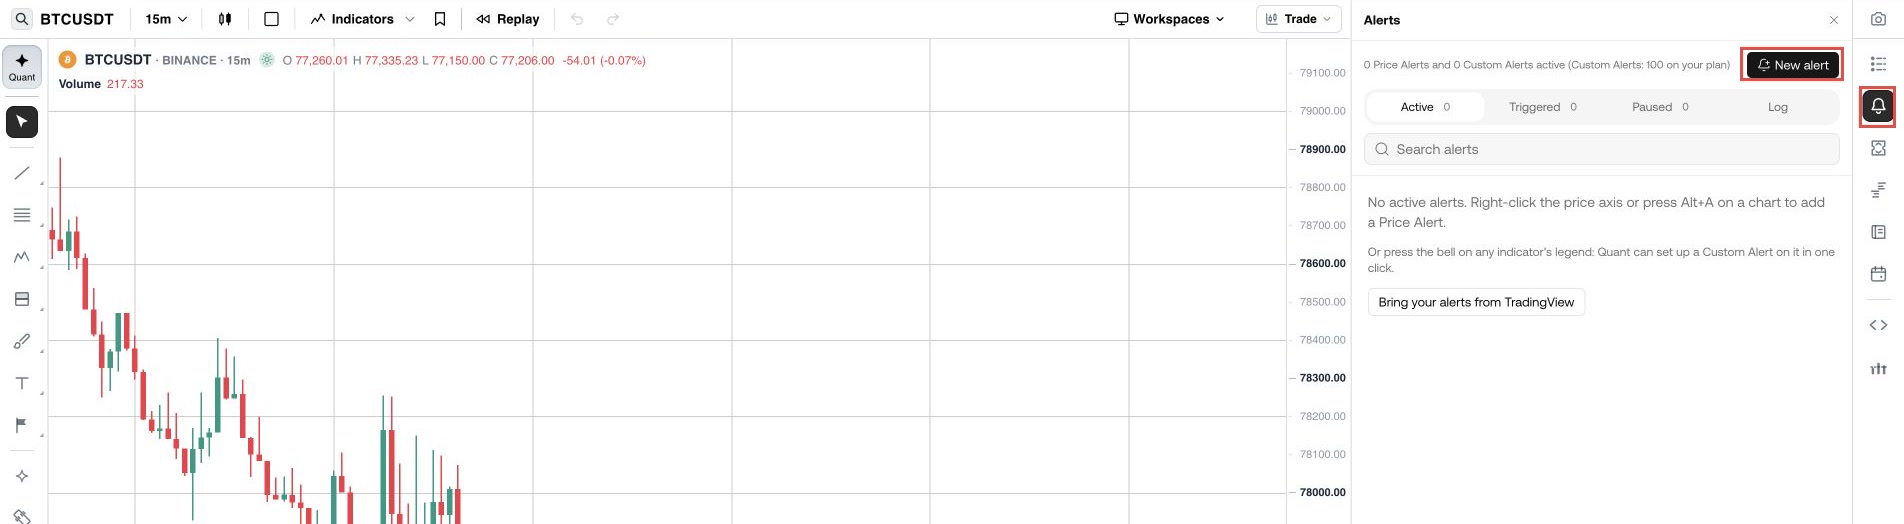
- Select Alerts (the bell) on the right-hand edge of the chart.
- Select New alert to open New Price Alert.
Use the right-hand Alerts panel shown below. The Alerts item in Vela’s main sidebar opens the older Screener alerts, which use a different setup.
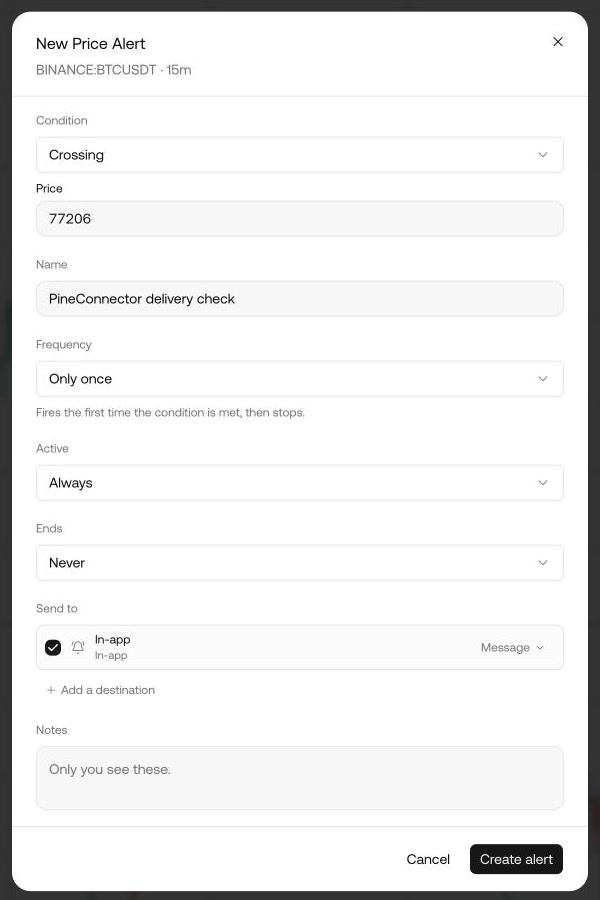
In New Price Alert, fill in these settings:
| Setting | What to enter |
|---|---|
| Price condition | Crossing, with a level close to the current price on your chart. The alert waits for price to cross that level. |
| Name | PineConnector delivery check |
| Frequency | Only once, so this test alert stops after its first trigger. |
For a quicker connection check, use Greater than with a level below the current price on a chart receiving live updates. This checks whether price is above the level; it does not wait for a crossing.
Keep the form open. Add the destination and message in steps 3 and 4 before selecting Create alert.
3. Add the PineConnector webhook
Section titled “3. Add the PineConnector webhook”A webhook sends an alert’s message to another service over the internet. Here, the URL tells Vela where to send it: PineConnector. Your License ID goes in the message, not in the URL.
If you already have a PineConnector destination, select it under Send to and check that it uses the URL below. Otherwise:
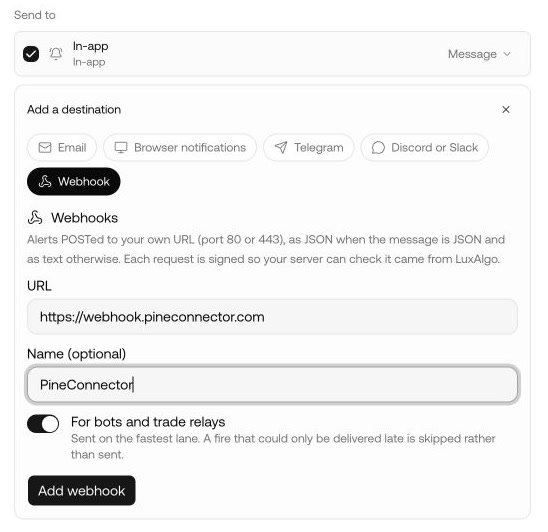
- In the open alert form, go to Send to → Add a destination → Webhook.
- Paste the URL below into URL.
- Enter PineConnector as the name.
- Keep For bots and trade relays switched on.
- Select Add webhook, then select PineConnector under the alert’s Send to section.
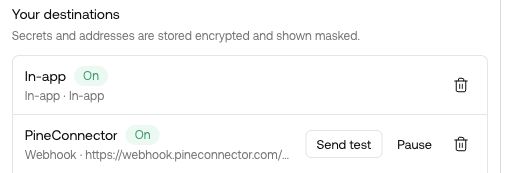
To check a saved destination, open Alerts → Destinations. Look for PineConnector with the status On.
4. Paste the connection check
Section titled “4. Paste the connection check”- Under Send to, select the PineConnector webhook.
- Expand that destination’s Message editor.
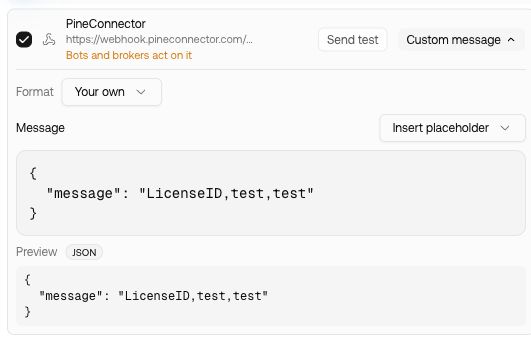
- Copy the entire example below and replace the editor’s existing contents with it.
- Replace only
LicenseIDwith the value you copied in step 1. Keep bothtestvalues unchanged.
The braces and double quotes form a JSON message, a structured format for sending data. You do not need to write code: keep the structure shown below and change the placeholder. The text after "message": is the instruction PineConnector receives. This instruction checks the connection without requesting a trade.
If Signal Authentication is enabled: open PineConnector Portal → Bridge, select Modifier, and check Signal Authentication. Use the exact Secret Key configured there. This is an extra check that prevents messages without the matching key from reaching MT5. Signal Authentication guide.
In Vela’s Message editor, add ,secret=YOUR_SECRET_KEY immediately after the second test, before the closing double quote. Replace YOUR_SECRET_KEY with your PineConnector key, keeping its uppercase and lowercase letters exactly as saved. If authentication is off, leave the example unchanged apart from your License ID.
Before creating the alert: confirm that your own ID has replaced LicenseID, the preview shows JSON, and the PineConnector destination is selected. Choosing a different Format after pasting can replace your message, so check the contents again if you change it. Vela message formats.
Select Create alert. Once the alert is Live, wait for the price condition to be met.
Bridge Logs is PineConnector’s record of incoming signals and their processing results. Check both Vela and PineConnector:
| Where to look | What to check |
|---|---|
| Vela → Alerts → Log | Match your alert name and trigger time. Open the event and check the webhook delivery result. |
| PineConnector Portal → Bridge → Logs | Match the time and demo account. Look for the test with Success. If it is In Progress, wait for the final result. |
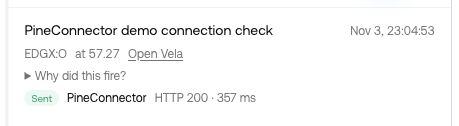
For a terminal receipt check, find your test’s row in Portal → Bridge → Logs and note its Signal ID. This identifies the individual message. Find that same ID in MT5’s Experts log. The Experts log records messages from the PineConnector software running in MT5. Open the terminal and logs in PineConnector Edge, or use Toolbox → Experts in your own MT5 terminal.

5. Send one demo trade request
Section titled “5. Send one demo trade request”This step sends a trade request, so check the destination again before creating the alert.
- In MT5, confirm that you are using the intended demo account, with no open position or pending order on the symbol you will test.
- In Market Watch, find the broker’s exact symbol name. For example, your broker may use
EURUSD.arather thanEURUSD. Right-click that symbol and select Specification. - Check the permitted minimum volume, volume step, quote precision and minimum stop distance. The examples request 0.01 lots, a 20-pip stop loss and a 40-pip take profit. Use them only if those values meet your broker’s rules; otherwise change the values before sending. How PineConnector pips work.
- In Vela, create a new Price Alert for the market you want to test. Set the condition as in step 2, name it PineConnector demo trade, and choose Only once.
- Select PineConnector under Send to, expand Message, and paste one of the examples below. Choose either buy or sell, not both.
- Make these replacements in the message:
| Text in the example | What to put there |
|---|---|
LicenseID |
The License ID copied from Connections for your single demo account. |
EURUSD |
The exact, case-sensitive symbol from that account’s MT5 Market Watch, including any suffix. |
vol_lots=0.01 |
The trade size in lots. Change 0.01 if you need a different permitted demo size. |
sl_pips=20 |
The stop-loss distance in PineConnector pips. Change 20 if needed for the broker’s rules. |
tp_pips=40 |
The take-profit distance in PineConnector pips. Change 40 if needed for the broker’s rules. |
One PineConnector pip equals 10 quoting points. Its price distance depends on the broker’s symbol precision. If you cannot access the MT5 specification, ask your broker for it before choosing the values.
If Signal Authentication is enabled, add ,secret=YOUR_SECRET_KEY at the end of the instruction, before the closing double quote, and replace the key as in step 4. Keep the JSON braces, commas and double quotes intact.
Illustrative request. Requests a 0.01-lot market buy with a 20-pip stop loss and a 40-pip take profit. No trade was executed for this example.
Illustrative request. Requests a 0.01-lot market sell with the same distances. No trade was executed for this example.
Send and check the result:
- Review the demo account, message and trigger. When the broker’s market is open, select Create alert once.
- After it fires, find the event in Vela → Alerts → Log and the matching result in PineConnector Portal → Bridge → Logs.
- In the intended MT5 demo account, check Trade for an open position or History if it has already closed. Confirm the symbol, buy/sell direction, volume, stop loss and take profit. Check that there is no unintended duplicate. Where to find the trade in MT5.
- Remove both temporary Vela test alerts when you finish, including any that never fired. Close the demo test position in MT5 if it is still open.
Use your indicator or strategy
Section titled “Use your indicator or strategy”After the demo trade check, you can replace the simple price condition with your indicator or strategy’s condition.
- Find the indicator or strategy’s name on your Vela chart (its legend).
- Select Add alert (the bell) beside it.
- Check the market and timeframe at the top of the form.
- Choose the Condition and When it fires. For example, Once per bar close checks the condition when a candle closes.
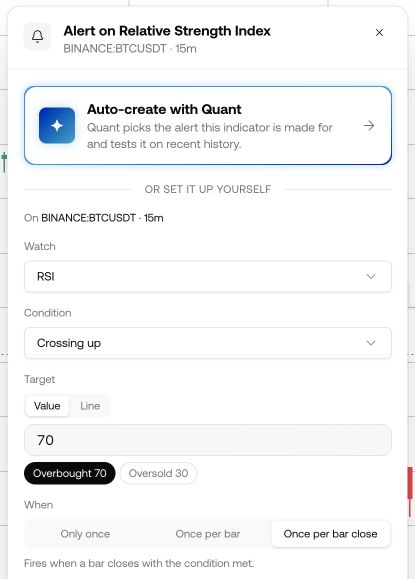
Under Send to, select PineConnector and use the same JSON message format, with your own License ID, broker symbol and permitted values.
Decide what each strategy event should do before choosing its PineConnector command. A strategy’s “sell” event might mean entering a short position or exiting a long position; do not assume those are the same instruction. Use the PineConnector command reference to choose the intended action.
A Custom Alert can send the same message every time it fires. Check its frequency and test it on demo before relying on it. If you later change the script or its inputs, recreate the alert so it uses those changes. Remove temporary strategy test alerts when you finish. Create Custom Alerts in Vela · PineConnector commands
Use structured JSON fields
Section titled “Use structured JSON fields”PineConnector also accepts a JSON object with a separate field for each instruction. Multiple lines still make one message, not one trade per line. Choose either this format or the earlier {"message":"LicenseID,..."} format; do not combine them.
Check the connection with separate fields
Section titled “Check the connection with separate fields”In the Vela alert’s Send to → PineConnector → Message editor, replace the entire message with this object. Replace YOUR_LICENSE_ID with the ID from step 1. Use the same Only once trigger and verification steps as the earlier connection check.
This requests a connection check, not a trade. Keep "command": "test" and "symbol": "test" unchanged. If Signal Authentication is enabled, add a comma after "symbol": "test", then add "secret": "YOUR_SECRET_KEY" on the next line before the final brace. Replace the key privately with the value configured in PineConnector.
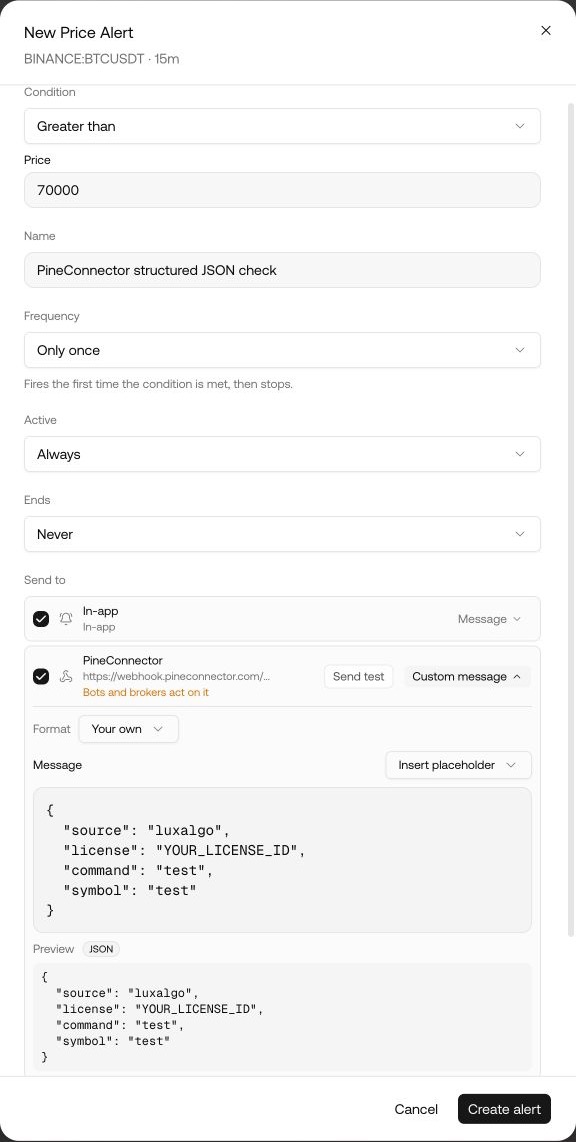
For a trading alert, use the required PineConnector command in command, your exact broker symbol in symbol, and the relevant parameters as separate fields. For example, the earlier demo buy can also be written as follows:
If Signal Authentication is enabled for this structured buy: add a comma after "tp_pips": "40", then add "secret": "YOUR_SECRET_KEY" on a new line before the final brace. Replace the key privately. The secret is a separate JSON field; do not append ,secret=... inside another field’s value.
Illustrative request; not an executed trade. Requests the same 0.01-lot market buy, 20-pip stop loss and 40-pip take profit as step 5. Make the same License ID, broker-symbol, volume, stop-distance and authentication checks before sending. Use sell only for an intended short entry; use closelong or closeshort for the corresponding close instruction.
Existing Screener alerts: use the strategy event
Section titled “Existing Screener alerts: use the strategy event”For an existing Screener alert, one webhook can handle the four strategy events:
- Open Alerts in LuxAlgo’s main sidebar and select the existing alert.
- Select its webhook under WEBHOOKS. The separate Notifications → Message field is not the webhook payload.
- Set URL to
https://webhook.pineconnector.com/api/webhook. - Under Events, select the events your strategy should send: Long, Short, Exit Long, and Exit Short as applicable.
- Replace Payload (JSON) with the complete object below. Replace the License ID, secret and any broker-specific values before saving.
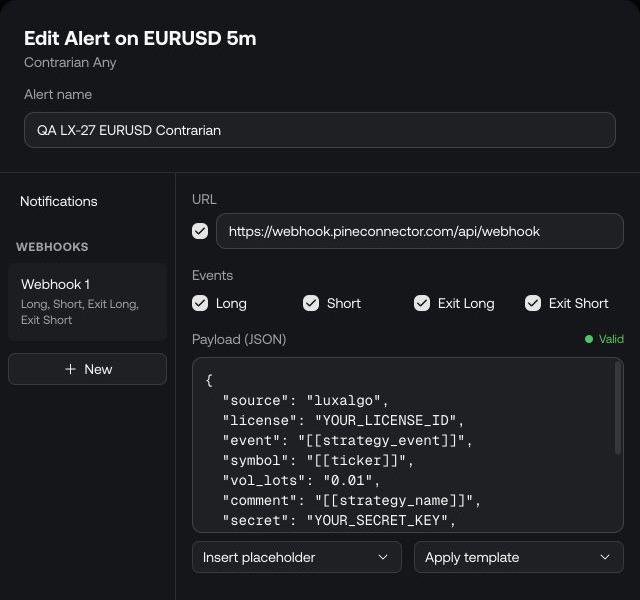
Illustrative template; not an executed trade. An entry event requests 0.01 lots; an exit event requests the corresponding close command. This template does not include explicit stop-loss or take-profit fields. The event selects the action, as shown below; it does not make each line a separate request.
| Field | What to enter or check |
|---|---|
source |
Keep "luxalgo". This labels the source; it does not select a trading action. |
license |
Replace YOUR_LICENSE_ID with your intended demo account’s License ID from Connections. Keep it in double quotes. |
event |
Keep [[strategy_event]]. LuxAlgo fills it with the strategy event when the alert fires. Do not substitute [[strategy_order_action]]. |
symbol |
[[ticker]] supplies the chart ticker. Confirm that it matches the broker’s exact MT5 symbol. For a single-market alert, you can replace it with that exact broker symbol; alternatively, configure Symbol Mapping when available on your plan. |
vol_lots |
"0.01" is an example entry size in lots. Check the broker’s permitted volume before use. It does not turn an exit into a 0.01-lot partial close. |
comment |
[[strategy_name]] supplies the strategy name as the trade comment. It does not, by itself, restrict which positions a close command can affect. |
secret |
Replace YOUR_SECRET_KEY with the configured PineConnector authentication key. If Signal Authentication is off, remove the entire secret line. |
meta |
Optional information supplied with the event. PineConnector ignores this nested object when building the trade instruction. In particular, meta.price does not set an order’s execution price. |
LuxAlgo event |
PineConnector command | Requested action |
|---|---|---|
long |
BUY |
Open a long position. |
short |
SELL |
Open a short position. |
exit long |
CLOSELONG |
Close eligible long positions on the symbol. |
exit short |
CLOSESHORT |
Close eligible short positions on the symbol. |
Close scope and entry behaviour still depend on the receiving account and EA settings. Do not assume that a new opposite entry closes the existing position, or that every strategy emits a separate exit before reversing. Verify your strategy’s event sequence on demo.
Before saving: confirm that Payload (JSON) shows Valid, all required substitutions are correct, and the selected events match your strategy. Valid checks the JSON structure; it does not verify your License ID, secret, broker symbol or resulting trade. PineConnector rejects an unresolved square-bracket placeholder in a field used for the trading instruction.
Save only when the destination and message are ready. After an event fires, follow the Vela, Bridge and MT5 checks in step 5. For an exit, confirm the intended position closed and no unintended opposite position opened. If the result is unclear, investigate the original event before repeating it.
If a signal is missing
Section titled “If a signal is missing”| What you see | What to check |
|---|---|
| Webhook is missing | Check your LuxAlgo plan. If the destination is missing, add it under Webhooks in LuxAlgo Account Alerts. If it is already On and still missing from the alert’s Send to section, check webhook availability with LuxAlgo before creating the alert. |
| The alert is live with no event in Log | Check the market, live quote and trigger level. |
| Vela shows a delivery failure | Open the delivery result. Check the URL and that you pasted the full JSON into the webhook’s Message. |
| Vela shows delivery but Bridge has no matching result | Check the License ID, the demo account’s connection and the Signal Authentication key if enabled. Troubleshoot a missing alert |
| Bridge shows a rejection, or the step 5 trade is missing | Check the License ID, authentication, broker symbol and the error in Bridge or the EA logs. Troubleshoot a missing alert · EA errors |
Before repeating a trade request, wait for the final result in Bridge Logs and check Trade and History in MT5 for the original order. If the result is unclear, troubleshoot the alert before sending again.